
Do you love learning about history? Does it ever inspire you?

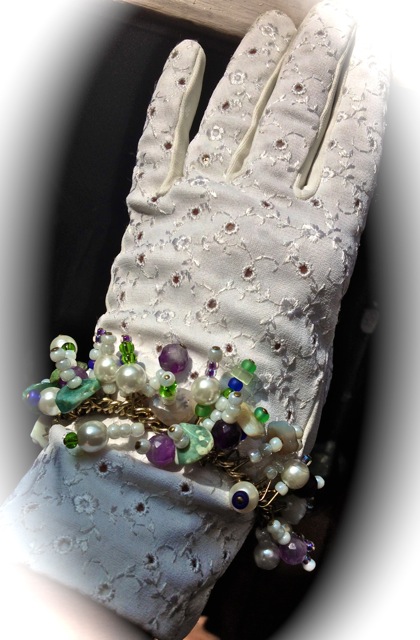
Then think “Suffragettes” and you’ll know why I’ve designed a bracelet in green, white and violet.
Recently, I did a guest post on Christy Burmingham’s blog WHEN WOMEN INSPIRE. It’s titled #GreenWhiteViolet. It inspired me back!

I decided the bracelet needed earrings. I wound up making 2 pairs.

Just in case you want to make a bracelet of your own design:
DIY INSTRUCTIONS

One of my challenges was that I had to use what I could find at home, or in my kit.
I gathered my green, white and violet beads.I found white pony beads, violet lined glass seed beads, a string of real cut amethysts, and a string of fake pearls.
There were also some solid purple & green glass ponies and a string of agates, several in appropriate tones.

I never did use the crystals that you see in my platter’s collection.
You’ll need a needle nose jewelry plier, and a flat nose plier w/cutter.
Find some great chain.
Gather jump rings, jewelry pins to match the chain (or not to match, depending on your design) and a clasp.

Now creatively thread the beads onto the jewelry pins.
Try to keep an eye on what your building beforehand by clustering up some beaded pins, and havng a look!
If you’re happy then you can begin attaching your lovelies onto the chain.
INTERMISSION

Now, on with the DIY instructions!
 Cut the chain about 3 inches longer than you need.
As you add beads, they and the pins take up space so it will get shorter and shorter.
You also need to snip the jewelry pins to about 1/2 inch from the top bead.
Using the needlenose pliers, bend the end of the pin into an arc.
Hook the arced pin into the chain.
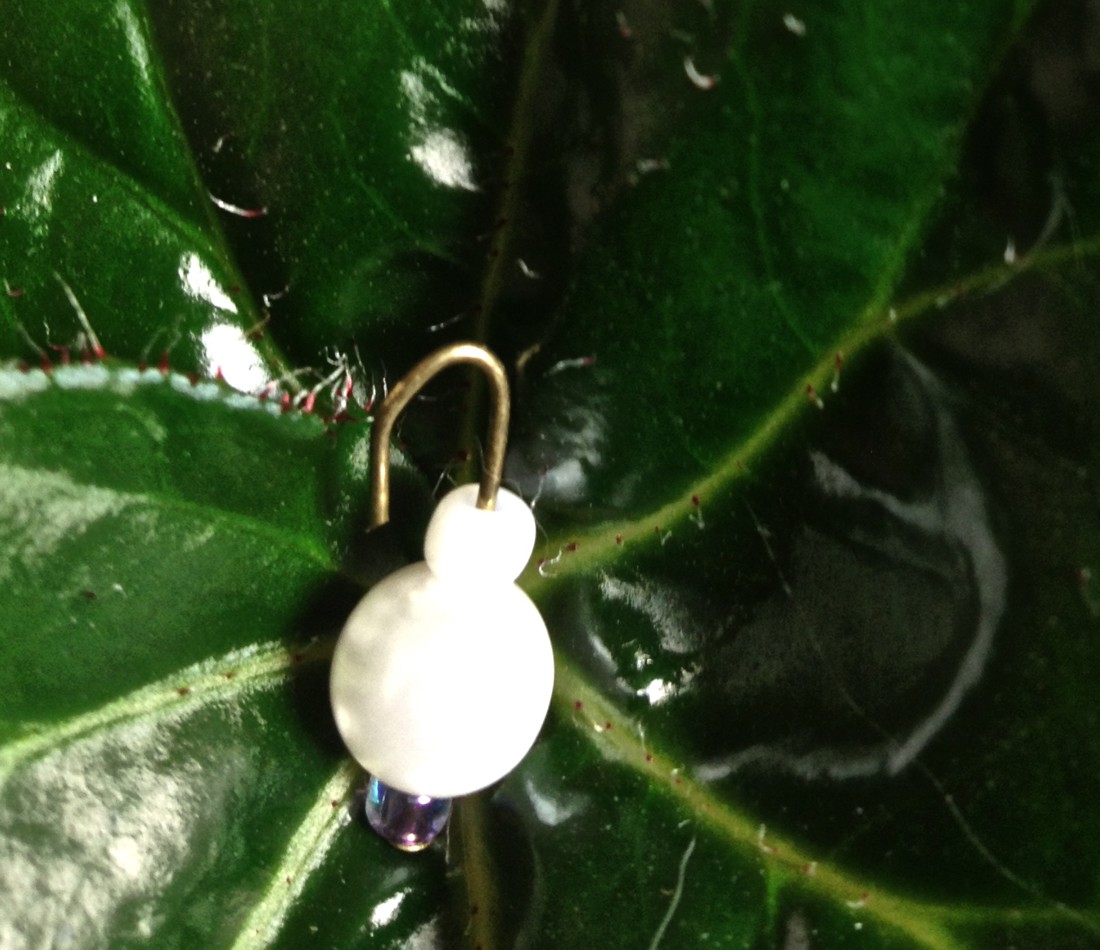
Again, using the needle noses, push the open end of the pin toward the piece of pin coming out of the bead.
Tuck the raw pin end inside the bead to finish it.
Keep attaching beaded pins.
Before the bracelet is fully clustered up, check how it’s fitting your wrist.
Add the clasp to one end. You may need to use a jump ring here.
If your chain is not open enough for
your clasp to fit through, you will need to add a jump ring to the appropriate place at the other end.
If needed snip off excess chain.
TIP: Hold the beaded pin with the flat nose pliers in one hand, while you work with the needle nose in your other.
Click on pics for larger details.
TO MAKE EARRINGS
You will need a pair of “shepherd’s hooks” or a pair of clips.


Use all of the same beads and findings.
Using the same techniques as for the bracelet, design and build your earrings.
Unless they are symmetrical, remember to make a left and a right.
Slideshows are visual poetry. Here is my prose. However, if you feel like reading a written poem, check out Christy Birmingham’s blog Poetic Parfait
The past can be a nostalgic allure.
Until my next post, I wish you all a fond and romantic adieu!


Fabulous!! How is it that you can make EVERYTHING look sexy?!
Thanks Sherrie!
“lol” I take lots of shots and try lots of things. When it looks good,I keep it.
exquisite!!!!
Thank you, Cindy!
That’s gorgeous, Resa, and I just love ‘dangly’ colorful bracelets! Bravo!! 🙂 xx
Thank you so much, Marina! 🙂 xx
Wow – I would so wear all of these items. Just beautiful.
Thank you! I’m so very happy you come by for a look. I really like your blog,and I hope everything is well in your busy life! _Resa
Resa – You’re styling once more 🙂
A little bit! I do love styling. 🙂
This was easy. It only took a few hours, as compared to an Art Gown. Those take me weeks, sometimes over a month to compose.
I wrote a guest post for another blog. It was a huge change (rest) for me. I got some umph back out of it, and did the bracelet!
“lol” I signed up for a writing seminar tomorrow. 😀
kudo’s for you on the seminar.
Of all things I have always liked buying jewelery for my wife and girls. Once though we were in Tiffanies in Downtown Chicago and I said to Jan, now that I can afford to buy you something here, I can’t think of anywhere you could wear it that I’d want to go….
sigh….
“lol” “hahaha” Well I’m heading out to a barbecue shortly and I am wearing my new bracelet! 🙂
you’ll be dazzling 🙂
Love it! and thanks for the instructions!
Thank you, and I hope you get to make a bracelet, or any of many things that this technique of hooking onto chain can lead to. I’m thinking I need a new key ring!
Love it!
Thank you, Elena! Your work is so fabulous that I am honored by your comment! I wish you continuing success! _Resa
Very beautiful creations, I like a lot 🙂
Merci! Thank you for coming here to see it! Your poems are wonderful! 🙂
Oh Dearest Resa ~ you most certainly would have made the Suffragettes very proud with this post!; And your design and creation of the stunning bracelet, and 2 sets of earrings is just divine. There are elements of romance, mystery and charm in this layout and presentation; At the same time it is very much aligned with historical symbolism and a deeper purpose. You always amaze me with your talent and creative gifts ~ Gorgeous post!! Much Love to you dear FGS – and thank your for continuing to include me in your most thoughtful update page on the sidebar ~ so grateful always, FGS
~ Robyn
Thank you dearest FGS Robyn!
I’m so glad you like my creations. Even more, I’m thrilled you see the creative energy I put into my presentation and layout!
It certainly was an interesting time for the Suffragettes, and it still is for those of us continuing in the spirit.
I want to thank you for the fabulous shots you took for your Robyn Page. It’s such a joy to have you here that no thanks are needed.
You make it so easy to be thoughtful!
Much love back to you, my one and only FGS!
FGS Resa xoxo
Resa, Your creations are beautiful! Thank you for the links to my blogs and for your lovely bracelets, earrings and … your friendship! The DIY directions are awesome too. I used to make jewelry, back in my 20s and I admire you for what you have created here. HUGS!
HUGS back to you, Christy! I’m happy you like the post. I am thrilled with the little project we have done! Hopefully we can do something else in the future. Until then I will be enjoying both of your blogs! More HUGS!
Beautiful creations,It may just top masters visionaries ,as You, my good friend, You are great ! maxima with love
Thank you Stefan! I appreciate your kind words. Cheers, and have a great weekend!
Not just your inimitable style and beauty but instructions, too! You have outdone yourself, Resa, and I love your inspiration for this project. I’m so sorry I’ve been neglecting you, but I plan to remedy that!. Love your work, as always, Imelda
Imelda, great to see you! (well, your Gravatar and words)
Not to worry! I haven’t been around much either. No time for a gown, so in the meantime t-shirts and bracelets! Love your work, too! _Resa
That bracelet is absolutely chic and gorgeous… It made me think of Audrey Hepburn with her gloves and distinguished style 🙂
Thanks for sharing and all the very best to you, dear Resa,
Aquileana 😀
Audrey Hepburn is the ultimate in chic! Thank you for this fab compliment!
The best to you, too, and have a great weekend.
Resa 😀
Love this! I have a whole list of things I want to try making…once I find the time. Keep creating!
I will keep creating! You love reading, and probably use all your spare time for reading. I would love to read more, but need to find more time. It’ seems time is the culprit!
I love that first comment! Everything is so sexy- and you make it look so doable. And I’m going to have to pass this on to my beading/jewelry making friend who does have a ‘kit’- My kits consist of metric or english biscuit cutters, fancy spatulas, ramekins and moulds:)
Beautiful jewelry I’d be thrilled to wear. I’m loving the colors and textures.
cheers… and happy fall xo
Happy fall, Wendy! Hmmm biscuit cutters sound interesting to me… although not for biscuits. “lol”
I’m glad you like the bracelet. I’m trying to make a stash of them (in spare time) for a Holiday sale.
Hope this post inspires your friend who beads
Cheers, and again….Happy Fall! xo
gorgeous and beautiful set , the colours do match perfectly! xo
Thank you, Francina! xo
So gorgeous, Resa.
I agree with Sherrie… You just ‘know how’… 😉 😉
xoxoxo
XOXOXOXO
What fun, Resa! It’s a lovely how-to. This is one of my favorite color combinations for many years. Maybe that’s because it reminds me of the hues in rainbow fluorite gems.
Thank you, Teagan! sorry it took so long to find this. Off to look up fluorite gems!
🕊hugs🕊